Hummingbirds are so fun to watch. Making your own Hummingbird Feeder is actually a lot easier then I anticipated. It can be done with recycled containers! The next time you or your kids drink anything out of a plastic bottle that has a screw on cap keep it and put it aside for this project. The next time you eat something out of a short squatty plastic container with a lid keep it and put it aside for this project.

Hummingbirds send out scouts at the beginning of May, two weeks before Mother’s Day. If you want to watch Hummingbirds all summer long you need to have your feeders filled and ready when those scouts are out.
This is a great project to do with Dad because a power drill can be involved. It isn’t absolutely necessary, but it is does make the project go faster. I’m not saying Mom’s can’t use power drills. I am a Mom who actually gave a power drill to Dad because his was dying and I was tired of a drill that wouldn’t work each time I used it! My kids are always wanting to do a craft with Dad, but cutesy crafts are not his thing. This isn’t frilly but it does go outside which seems to be his domain so chances are he would go for this craft.
Supplies:
- plastic bottle with a screw on cap
- short squally plastic container with a lid
- rope/twine, just a couple feet at the most
- red fingernail polish or red permanent marker
- scissors
- power drill or sharp object like an ice pick that can puncture a plastic lid
Directions:
- Thoroughly wash the plastic containers.
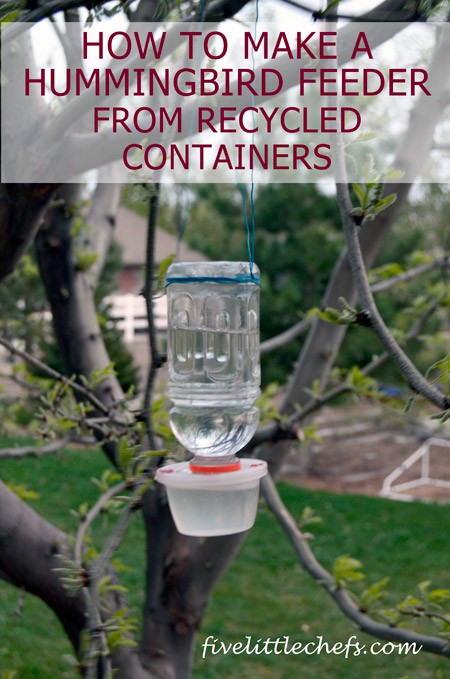
- Create a hole in the center of the short squatty lid just big enough to fit over the plastic bottle top (the part you drink out of). We traced a circle then drilled holes just inside the circle then used scissors to cut the remaining parts.
- Color 4 dots on the top of the short squatty lid as the corners of a square. It doesn’t need to be precise. Use fingernail polish or a red permanent marker. The red is telling the hummingbird where to feed. If you are using a red permanent marker be sure to check it often and reapply as needed.

- Drill 4 holes in the middle of the red dots.

- Drill a few holes in the screw top lid.

- Using the rope/twine create a hanger to hang on a tree.
- Fill your bottle with hummingbird nectar. (directions at the end)
- Place the short squatty lid over the bottle top upside down.
- Screw on the bottle lid.
- Attach the short squatty container to the lid.
- Flip the hummingbird feeder over.
- Find a nice tree and hang it up. If there is shade close by the hummingbirds will appreciate a little relief from the sun. You have created your very own Hummingbird Feeder.

How To Make Hummingbird Nectar
- Mix 1/2 cup of sugar with 1 cup of hot water.
- Stir until the sugar dissolves.
- Add 1 cup of cold water.
- Fill your hummingbird feeder. Any extra nectar may be stored in the refrigerator for about 2 weeks.
- When you refill your feeder don’t forget to clean it first.

2 Replies to "How to make an easy Hummingbird Feeder for kids"
Crystelle Boutique April 29, 2014 (3:33 pm)
What a fun container!!! do the birds like it?
🙂
“hugs” Crystelle
Crystelle Boutique
Beth June 5, 2016 (9:41 am)
You would not want to turn kids loose with this idea, but on my squat container lid, I held the lid over a candle for a few seconds, until it turned melty, and then jammed it down over the bottle neck. There will probably be a plastic bubble covering the top of the bottle now. I just took a paring knife and scored at the lowest part of where the squat container lid sat, and it sort of tore/broke away. Not only did I have a tight fit (the lid seemed to suction seal itself around the neck), but no jagged edges or ruining my scissors.